Seagate Software VISIT User Guide
Installing
VISIT
Overview
Connecting
to Seagate Software
Completing
the Seagate Software VISIT Wizard
Resolving
Your Issue
The
SupportNow Toolbar
Advanced
Settings
Troubleshooting
VISIT
Before you can start a session using VISIT, you must install the program.
1.If necessary, download the file called Visit.exe
2. Follow the instructions in the installation program and accept all of the default options for the installation.
Installing VISIT is a relatively short process (two minutes or less) and does not require that you restart your computer.
Once the program has been installed, an icon appears on your desktop called Get Support for Seagate Software

Once you have installed VISIT, follow these general steps to resolve your issue:
-
Connect to Seagate Software.
-
Complete the Seagate Software VISIT Wizard.
-
Resolve your issue.
-
Disconnect from Seagate Software.
Refer to the following sections for more details about each step.
Connecting to Seagate Software
Start VISIT. To do this, double–click the Get Support
for Seagate Software icon on your desktop.
- Or -
On the Start menu, click Programs and then SupportNow
2.5. Click Get Support and then Get Support for Seagate
Software.
The SupportNow toolbar appears on your desktop and a series of connection dialog boxes such as the one below appear. The connection process is automatic.

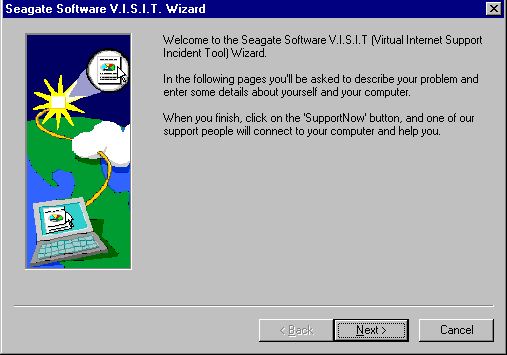
Completing the Seagate Software VISIT Wizard
After a connection has been established, you will be asked to complete the Seagate Software VISIT Wizard. You will need to complete the wizard each time you connect to Seagate Software.
Follow the instructions in the wizard to provide relevant contact and diagnostic information.

After completing the wizard, a dialog box appears, which tells you that the program is waiting for a Technical Support Representative to connect.

Once the Technical Support Representative has connected the dialog box disappears.
Now that you are connected to Seagate Software Technical Support through VISIT, a Technical Support Representative can view your desktop and help you resolve your issue.
|
NOTE |
VISIT is configured to connect to Seagate Software
in Read-Only mode. This means the Technical Support Representative
can only view your desktop – not make any changes. If you decide
to give the representative Full-Access, you can do so by
clicking the Full-Access icon |
You can disconnect from Seagate Software and end the
call at any time by clicking:
Stop ![]() or Exit
or Exit ![]() on the SupportNow toolbar.
on the SupportNow toolbar.
The SupportNow toolbar appears on your desktop when you first begin a VISIT session and becomes fully active once the Technical Support Representative has connected. Place your cusor over the toolbar icons for a brief explanation on each function.
|
|
|
|
|
|
|
|
|
|
|
|
|
|
|
|
|
|
||||||||||||
|
|
|
|
|
|
|
|
|
|
|
|
|
|
|
|
|
|
||||||||||||
To change VISIT advanced settings
From the Start menu, click Settings,
Control Panel, and then OpSession.
-Or-
Click Settings from the SupportNow toolbar. The OpSession
Settings dialog box opens.
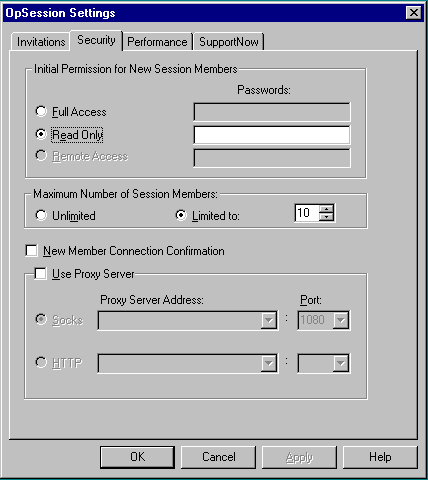
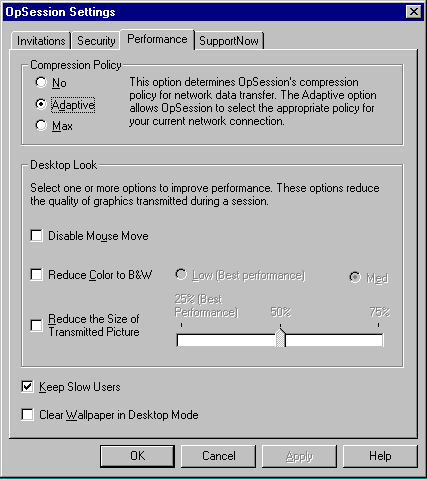
The OpSession Settings dialog box includes four tabs. The most important two, Security and Performance, are described below.
Security tab

|
Element |
Description |
|
Initial Permission |
Sets the initial access rights for a VISIT session. Under Initial Permission, click Full Access or Read Only. Full Access - grants the Technical Support Representative Full Access rights upon connecting. Read Only - restricts the Technical Support
Representative to Read Only rights upon connecting. Note: VISIT is configured during installation to start by default in Read Only mode. Generally, you will only need to change this setting if a problem is encountered during a VISIT session. |
|
Passwords |
Sets a password for the Technical Support Representative's initial connection to VISIT. In the Passwords box, type a password that the Technical Support Representative will be required to enter in order to join the VISIT session. |
|
Use Proxy Server |
Generally, VISIT uses the Proxy Server settings defined in your Internet browser. If you prefer to define the proxy server settings yourself, click Use Proxy Server. |
|
Socks |
Click Socks to exit the firewall via a Socks proxy server. |
|
HTTP |
Click HTTP to exit the firewall via an
HTTPS proxy server. |
|
Proxy Server Address |
If you selected Socks or HTTP, you will have to specify the hostname or IP address of the proxy server computer. Type the host name or IP address in the Proxy Server Address box. |
|
Port |
If you selected Socks or HTTP, you will have to specify the port that you want to use to connect to the proxy server. Type the port number in the Port box. |
Performance tab

|
Element |
Description |
|
Compression Policy |
Sets the compression policy for network data transfer. Click No, Adaptive, or Max. The Adaptive option allows VISIT to select the appropriate policy for your current network connection. In most cases, this is the best selection. |
|
Desktop Look |
The options in this area can be used to improve network data transfer performance. Note: These options are only helpful if you or the Technical Support Representative is using a slow network connection, such as a low-speed modem. If you are both working in high-speed network environments, these options may actually slow down VISIT’s communication speed. · Disable Mouse Move - Removes the red bounding box from the Technical Support Representative’s cursor when displayed in your application window. · Reduce Color to B&W - Transmits your application window in grayscale. Choose Low (2-bit grayscale) or Medium (4-bit grayscale) color reduction. · Reduce the Size of the Transmitted Picture - Transmits the your application window at a smaller scale. Choose 25%, 50%, or 75% zoom. |
|
Keep Slow Users |
If you have a slow Internet connection, click Keep Slow Users so that you remain connected to the session. |
|
Clear Wallpaper in Desktop Mode |
Reduces the amount of information transmitted, by filtering the Wallpaper from the Desktop image. |
VISIT’s basic application sharing technology is bitmap based. The following guidelines will help maximize performance:
Keep screen resolution to a minimum.
The best performance is achieved when your system uses 8-bit color (256 colors). Although VISIT supports 4-bit color (16 colors), it transfers screen information most efficiently when 8-bit color is used.
By default, the VISIT Client sets its compression policy to Adaptive during installation. The VISIT Engine changes the policy according to constraints introduced by the hardware and the network connection during a session. When working over a fast network, try setting the compression policy manually to No Compression.

